Business owners: Quick guide
After successful registration, we will see how easy it is to configure our point of sale and the many options that My Favorite Shop offers to you. Let’s start!
Home
In this tab, we will configure the business data. It is important to note that the data provided in this space will be what your potential My Favorite Shop user customers will see when they use the app in the CLIENT way.
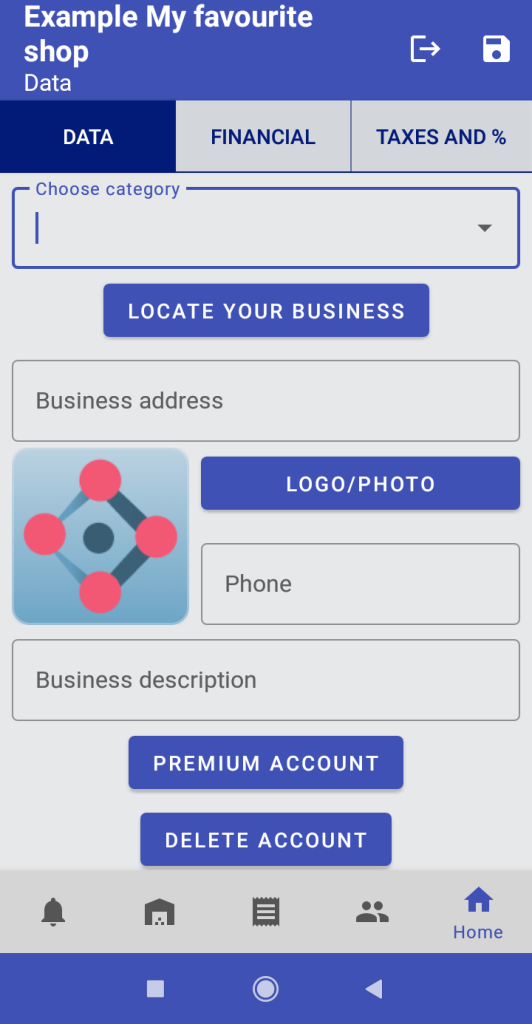
1.1 DATA tab
- Update/Change Your Store Name: By default, the registered “Business Name” will appear when you register. A simple “click” on the toolbar, and we can edit it. It is the name that will identify our business for nearby customers when they access through the app as CUSTOMER users: what your customers and potential users of My Favorite Shop will see when they use the app. The commercial name of your business and it does not have to be the same one that will appear on your invoices. That step is specified later.
- Choose category: quick information that will help potential external customers to identify your business.
- “LOCATE YOUR BUSINESS” button: The first time, the app will ask us to activate location permissions. They are necessary for your store to appear on the map to nearby potential customers. After selecting the location on the map, the address will appear below the button.
- “LOGO/PHOTO” button: The app allows you to share images via a url (for example, your own web page address) or a publicly shared link on Google Drive. Guide on how to share an image from Google Drive, here.
- Phone of your business.
- Business description: Slogan or brief description.
- “PREMIUM ACCOUNT” button: To access all the features of My Favorite Shop it is necessary to have an annual or semi-annual subscription premium account, but full functionality can be used/tested with the limitation of 5 products in stock for free.
- “DELETE ACCOUNT” button: Your account and associated data provided by you, customers or third parties will be permanently and irreversibly deleted.
- “FINANCIAL” tab: let´s see how configure all the necessary data to issue invoices.
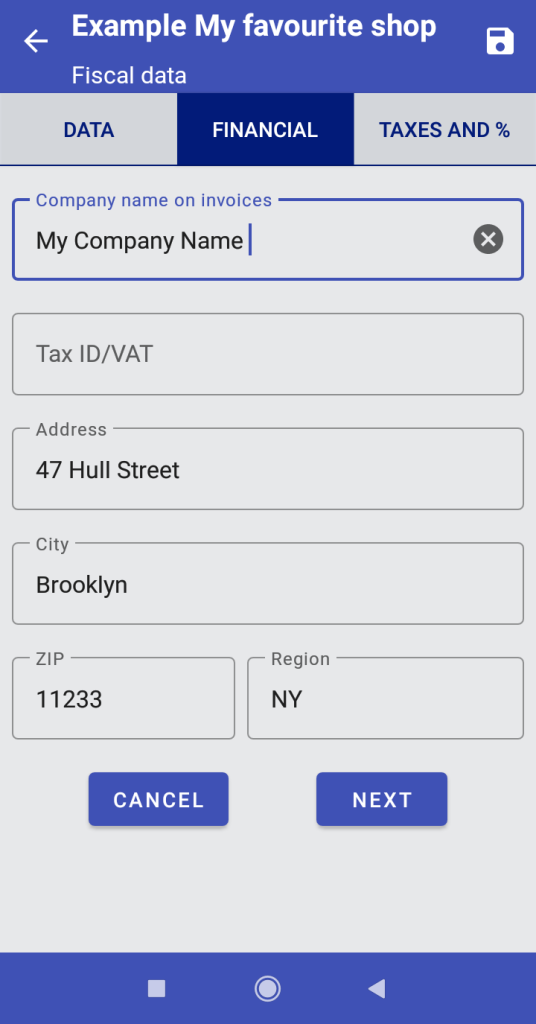
1.2 FINANCIAL tab
In this form we can fill in all the necessary data that will appear on our future invoices NOT for the CLIENT app users that access from outside. Notice the “Company name on invoices” could be different of the previous “Business Name” provided.
You could include your tax identification number (ID, VAT, NIF… or similar) if required by your country and the full address that will appear on your invoices.
Save and click on Taxes and %. We will access the screen that will allow us to configure/edit/update all needed taxes, percentages and rates. By default, is configured for 44 countries. Let’s see…
1.3 – TAXES AND %
My Favourite Shop allows you to configure taxes and percentages tailored to any tax system in your country/region.
Set up as many taxes as you need. Most likely you won’t have to fill in all the form fields, but if your tax system requires it, you can set up to 6 types of taxes/fees applicable to your purchases and sales.
Save and back and we are finishing the initial configuration and ready to add our first product to the catalog
You could include your tax identification number (ID, VAT, NIF… or similar) if required by your country and the full address that will appear on your invoices.

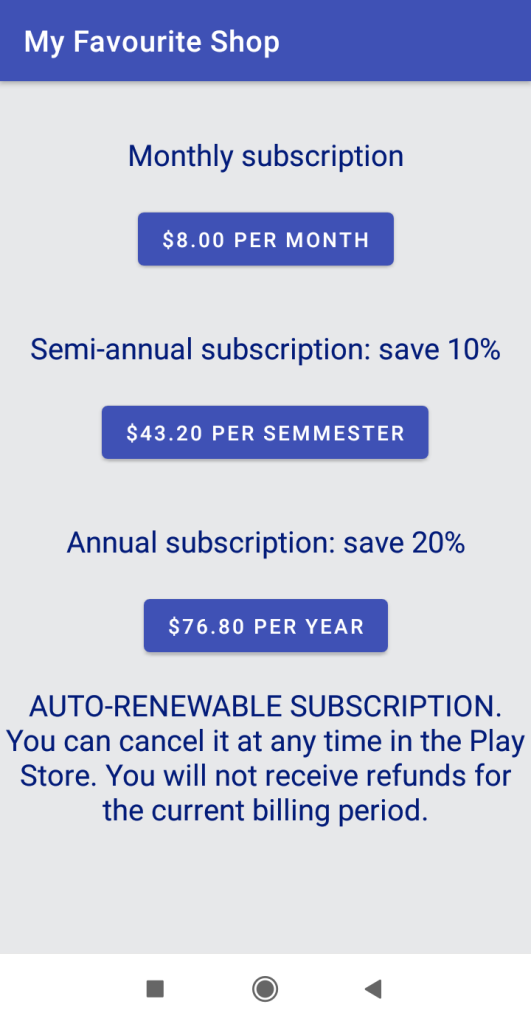
1.4 – PREMIUM ACCOUNT
On this screen, we will see the different subscription plans offered by the app: monthly, quarterly, or yearly.
All plans offer the same benefits and you just have to choose the plan that best suits your needs.
-
- Upload the entire catalog and offer all products through the app and not only 5 items/services;
-
- Enjoy the power of a complete point of sale, without added commissions or percentage charges on your sales.
-
- Charges are made securely through Google Play Store and you can manage your cancellation at any time.
* The prices of the photo are indicative and are subject to variations depending on your currency. For current prices, download the app and go to Home tab -> “PREMIUM ACCOUNT” button.
Warehouse
Here, we will have control of everything related to our warehouse and articles: stock management, prices, taxes and reports.
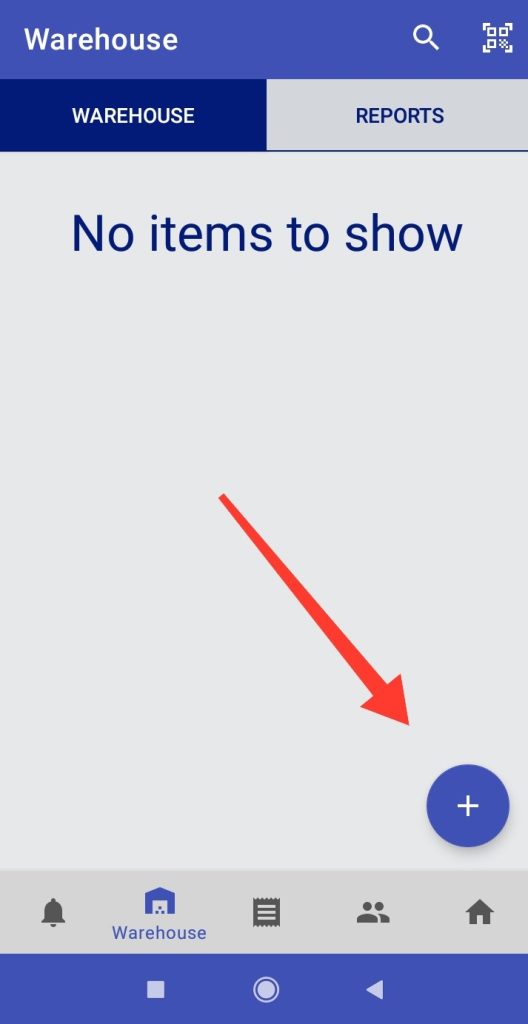
2.1 WAREHOUSE tab: List of our catalog
In this screen app show your catalog in alphabetical order. Any character typed in the search toolbar ( ![]() button) will filter your item listing by name, barcode or product description – any match.
button) will filter your item listing by name, barcode or product description – any match.
Barcode search ( ![]() button) opens your cámera and read any type of barcode or qr and matches the exact result with the item barcode of the items list.
button) opens your cámera and read any type of barcode or qr and matches the exact result with the item barcode of the items list.
Let’s click the ![]() button and add our first item.
button and add our first item.
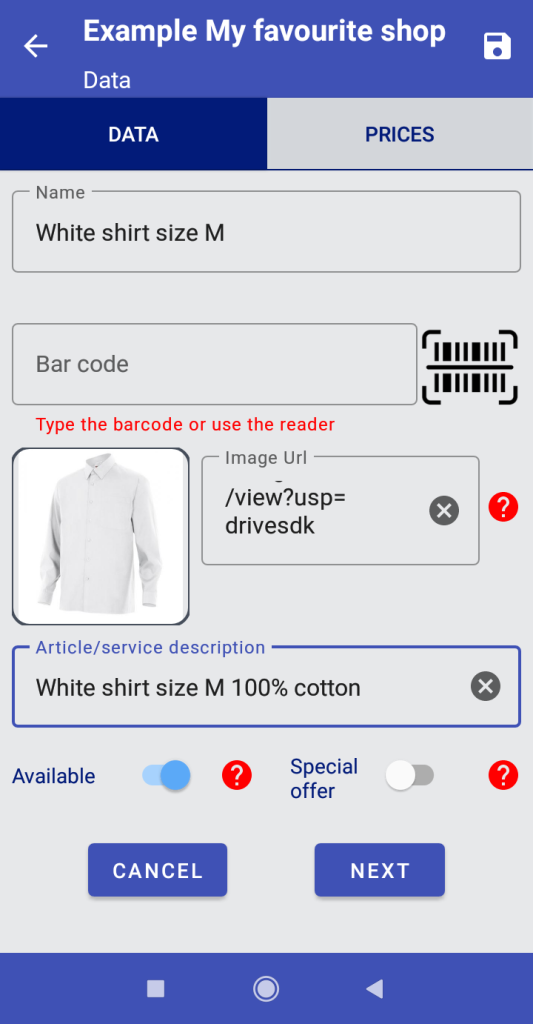
2.1.1 Add item: DATA screen
-
- Name of our item or service (required): Be careful, in case of adding a product with the same name or reference of a existing one, it will be overwritten with the updated data.
-
- Barcode: The app will ask us for permission to take photos and video if we want to use the barcode reader integrated in the app. Once the permission is granted, we will only have to focus the camera of our device on a barcode of any type or QR/bar code. We can also use this field to quickly reference a very common sales product and facilitate the search for it later. Suppose we have a product or family of products that we sell very frequently. We can use this field (without having to enter a barcode or QR code) to quickly find our product in the general listings. Example: In our example store, all the jeans could have a 1 in front as the first reference number, a letter for the size…; shirts a 2 as the first digit, the second for the size… etc.
-
- Image Url: valid url address of a photo of our product from an internet page or we can upload our own shared photos from Google Drive. Guide: How to share a photo from Google Drive.
-
- Switch button “Available”: With this option enabled, the service item will be displayed in your external catalog. If you want to temporarily stop offering a product/service, you do not need to delete it from your catalog, simply deactivate this option and the item will no longer be displayed to app users who access your store. Control your business in real time.
-
- Switch button “Special offer”: Products with this option activated will be the first to be shown in your external catalog.
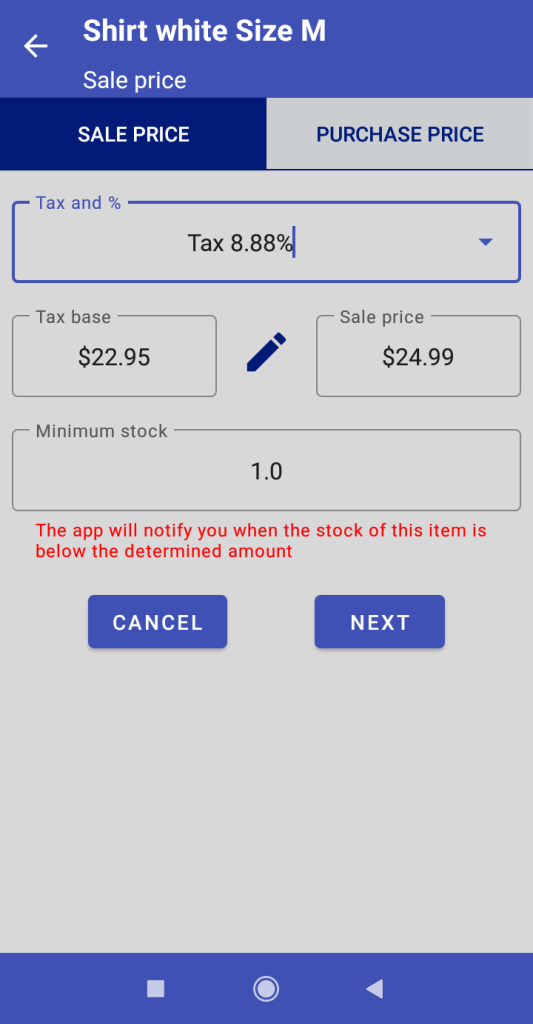
2.1.2 Add item: SALE PRICE screen
- Tax and % selector: Here we will choose the tax and percentage thereof applicable to the sale of our product or service. It must have been previously configured in “Taxes and %” in the “Home” tab.
- Minimu stock: The app will notify us when the available stock of the product is below this amount. Units of the product that you consider safe to prevent stock breaks.
- Base price,
 button and Sale price: When select a tax percentage or tap, the app will show you a dialog. Enter the sale price or the price without taxes and the app will perform the calculations with the selected tax rate.

2.1.3 Add item: PURCHASE PRICE screen
- Initial stock: Number of units that you initially have in your warehouse. The program will take the price included in this tab as the initial cost price of your stock for calculations in the reports.
- SAVE button and
 button on toolbar: Save changes and our product has been added.
 - Tax and % selector, Tax base button, Purchase price: It works exactly the same as the “SALE PRICE” tab, but the color is different so that the user always has a quick visual reference that they are editing a purchase price and not a sale price. Blue screens and forms for customers, sales and sales reports and red ones for suppliers, purchases and purchase reports.


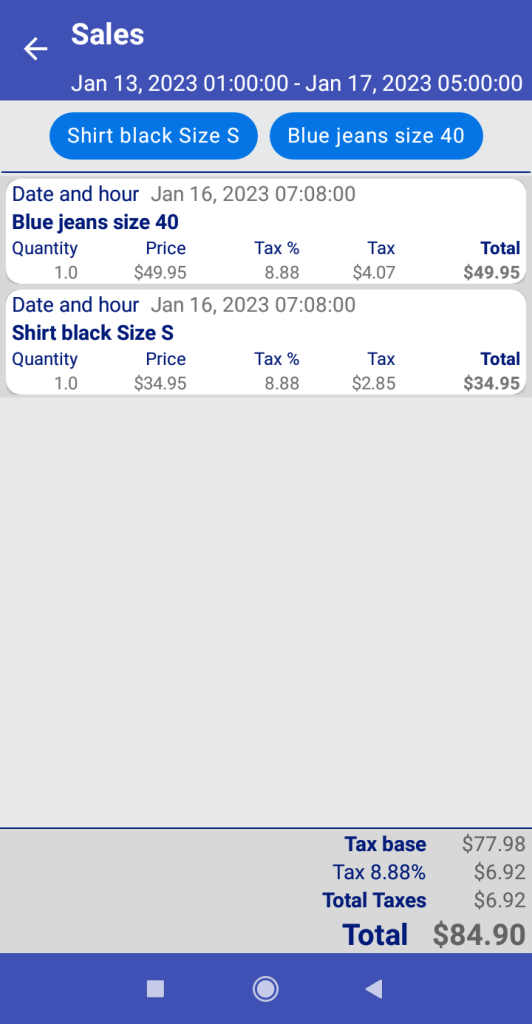
2.2 REPORTS screen
In this tab you can configure warehouse reports down to the minute.
Once the dates and time have been selected, you must choose whether you want a “Sales”, “Purchases” or “Sales & Items” or “Purchases & Items” report.


Tap in the item and will be added to your sales/purchases report. Tap again in the item or in the chip with the name and the item will be excluded of the report.
On the report screen we will see if it is a purchase or sales report and the dates it includes (toolbar). Then, the products that are included in the report (if we have selected a specific item) and at the bottom, a summary and total.
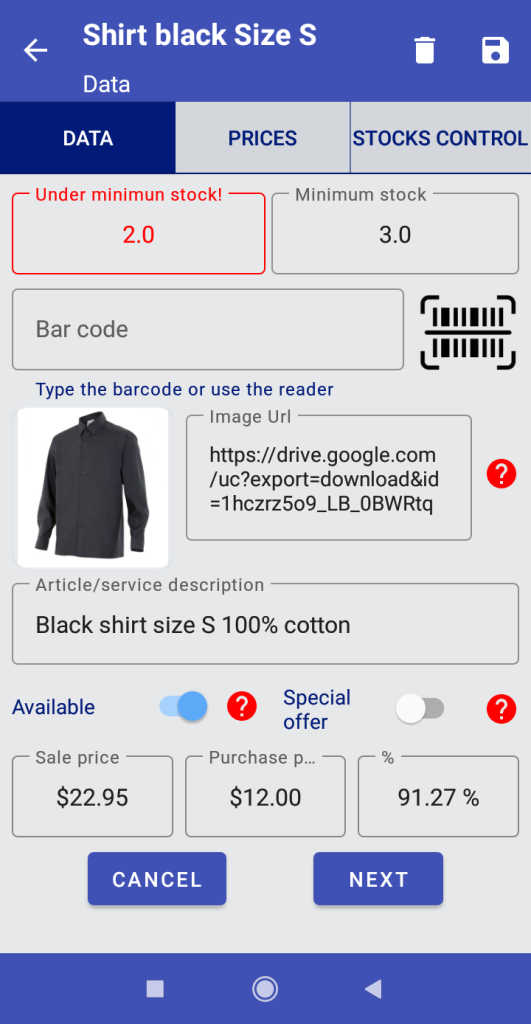
2.3 STOCKS CONTROL, edit and delete items
Simple click on our “Warehouse” items list and we enter in the Edit item screen. The toolbar will show us ![]() “delete button” and
“delete button” and ![]() “save changes button”.
“save changes button”.
All works similarly to adding a new item, but with two differences: we will see “Available Stock” / “Minimum Stock” fields at the top and “Sale price” / “Purchase price” and “%” (profit percentage) at the bottom.
2.3.2 DATA screen: Edit or delete warehouse items
“Available Stock” will indicate the number of items we have available in our warehouse. Important: Items will be deducted from our inventory when they are “Served” on our invoices, not when they are included in them.
“Minimum stock” will indicate the minimum quantity available below which the app will display a warning. This feature is especially useful when we want to avoid stockouts. When the “Available Stock” is below the “Minimum stock”, “Available Stock” will appear in red with the text of “Under minimum stock!”.
Also, we will see a “Warning” sign in the general listing of items. The “Warehouse” badge will show the number of items whose available quantity is below the planned “Minimum stock”.
The prices in the bottom will quickly show us the purchase price and selling price WITHOUT TAXES, and to avoid errors, the % field will indicate the profit percentage. If it is negative and we have set a selling price lower than the purchase price, it will show the percentage in red. For edit prices, click on “PRICES” tab.
2.4 PRICES tab
You can also modify prices, “Minimum stock” (in SALE PRICE screen) and “Initial stock” (in PURCHASE PRICE screen) just like when adding a new product.


2.5 STOCK CONTROL tab
This screen will show us a complete summary of all the movements of the item being consulted. In addition, we can filter (![]() button for advanced filters) the data and make adjustments (
button for advanced filters) the data and make adjustments (![]() button) to modify the stock of a particular item. After making the adjustment, the stock of the adjusted item will be changed.
button) to modify the stock of a particular item. After making the adjustment, the stock of the adjusted item will be changed.
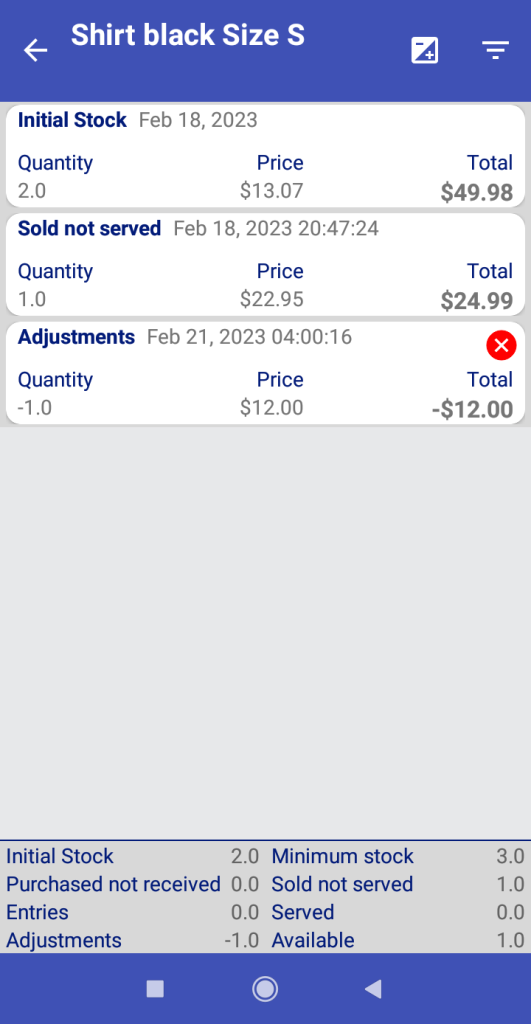
2.6 Adjustments screen
On this screen we can modify the stock of a certain item in cases of corrections, losses, damages, inventory updating, or any other reason.
We can select the date on which we make the movement, the valuation price of the item (without taxes) and the amount to be modified.
Let’s imagine that we discover that one of the shirts in our stock is damaged and cannot be sold. If the shirt cost $12.00 the adjustment would be as we see in the example, selecting “Negative” adjustment. This adjustment will subtract one available unit from our stock.
We will now look at our adjustment as one more move on our list.
The “Adjustments” will be editable from this same screen by clicking on ![]() button.
button.

Now the app will show us a warning in the list of articles in that item whose stock is below the established minimum.
Likewise, the “Warehouse” badge will show how many items we have below the minimum stock.
Notifications
3.1 Notifications management: push notifications and app alerts
In this tab we will see the orders/messages received by external users of the app. When a Client user accesses the My Favorite Shop app, they will be able to see the items in our catalog, place orders or reservations and contact our business. A client or potential client who uses this means to contact us will be added to our Clients database and the order will be added to our invoices automatically. The client himself will be the one to provide his data and, with the order, the invoice will be generated. Everything so that the management of administrative tasks will be as simple as possible and you can use your time to what is truly productive in your business.
Once a customer places an order, the app will notify us with a push notification* on our Android terminal. Plus, the notifications badge will show the number of received and unread notifications in real time.

* As Whatsapp, Telegram or any messaging app, you will receive push notifications only if you remain logged in to the app. If you log out the app you will not receive push notifications in real time but when you login again, you will see your notifications will be there without any loss of information.
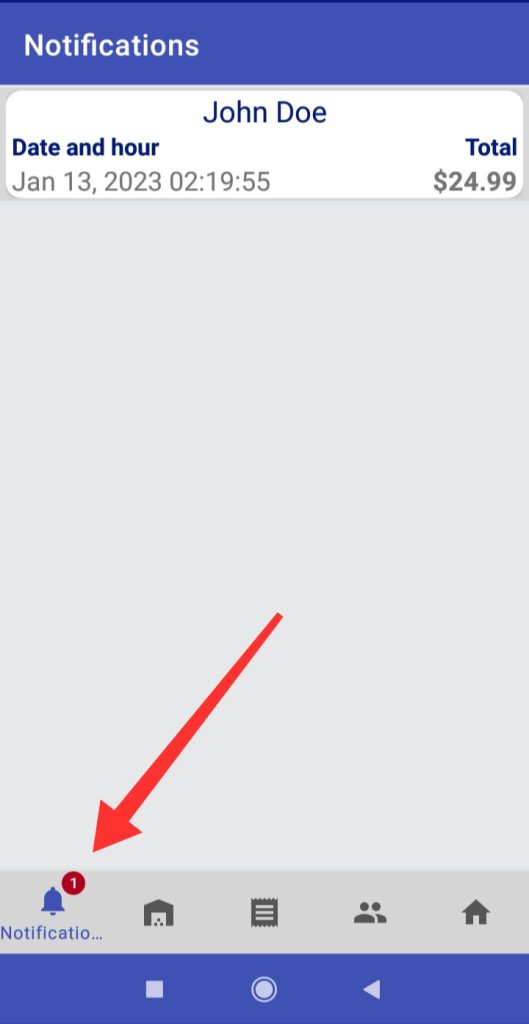
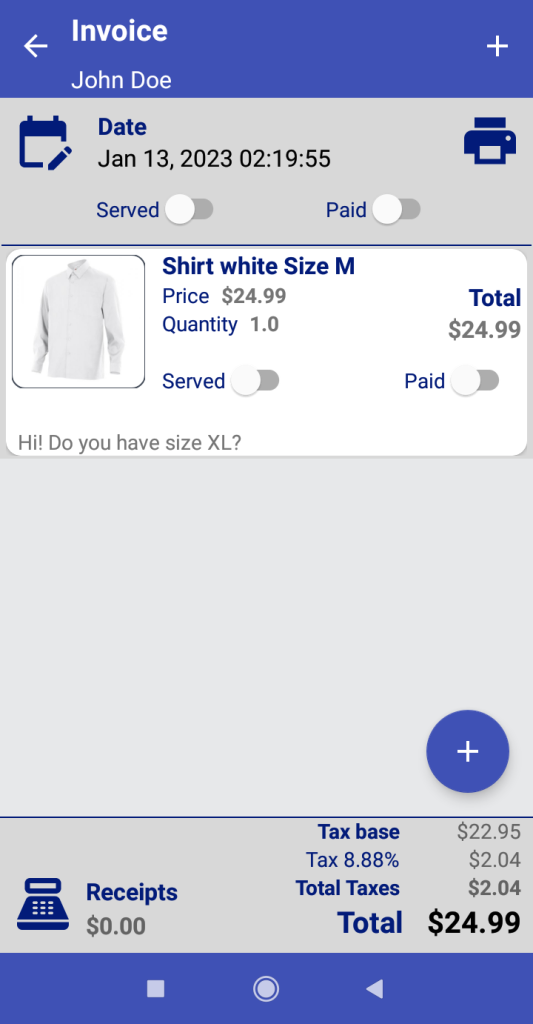
By tapping on the notification, we will see the details and its content. The customer´s billing and contact information (if they want to provide them) will be accessible from their file in the “Clients” tab of the app and the order invoice will also be added to our invoices list. Everything in an automated way.
We will be able to see the details of the item or items in our invoice, as well as any comments or requests from the customer, and the order status: Shipped, if the item has left our warehouse and delivery has been completed, and Paid, if payment has been received. The general statuses at the top will change once all items on the invoice are marked as “Shipped” or “Paid”.
In the next section, we will see how to perform operations with customers and suppliers.
Clients/Suppliers
In this tab we will have access to the list of clients and suppliers of our business.
4.1 CLIENTS screen
We can see that the upper part of the toolbar has a search function by name ( ![]() button) in the list and three quick filter buttons: “All”, “Not served” (which will show customers with amounts on their invoices pending to be served and the value in your currency of those amounts) and “Unpaid” (customers with pending collection amounts).
button) in the list and three quick filter buttons: “All”, “Not served” (which will show customers with amounts on their invoices pending to be served and the value in your currency of those amounts) and “Unpaid” (customers with pending collection amounts).
Okay, but… What if in my business almost all my sales are made to anonymous customers in my physical store? No problem: let’s see how to add a client/supplier to the app and more features of My favorite shopp app as a point of sale. Let´s click on ![]() button.
button.
SUPPLIERS tab work exactly the same way that CLIENTS tab with the only difference being that the design is in a different color to avoid tap errors.


4.1.1 Filtering options
By tapping on a client from the list, we will access the billing summary screen where we can also edit, delete and filter the information of that specific client.
In an efficient and fast way we will be able to have a list of the invoices of that client with amounts pending to serve or payment and to limit in all the possible ways the interval of time that we would like to show.

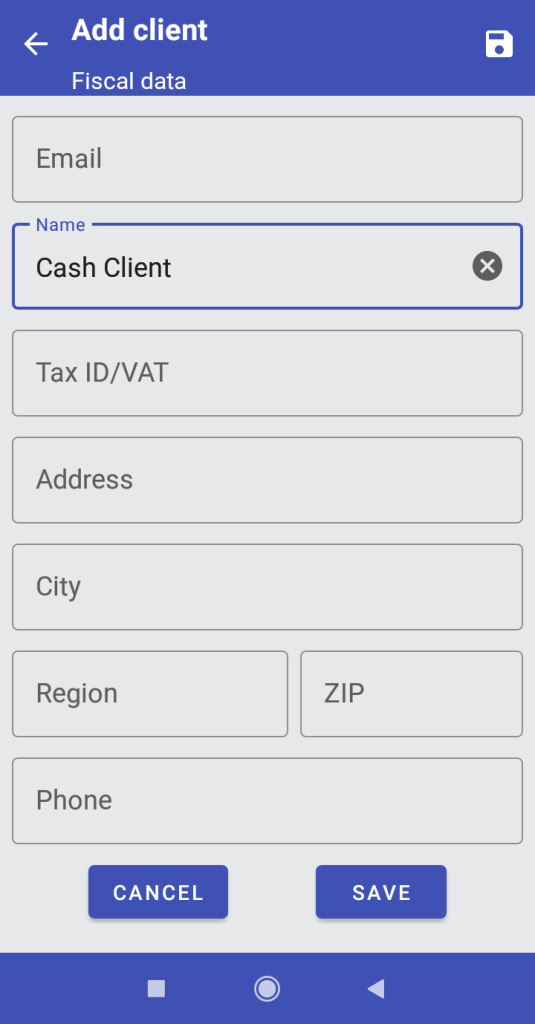
4.1.2 Adding a new client/supplier
Back to our general listing of clients, after pressing the ![]() button a form will be displayed where you can fill in the fields that we need to show on our invoices.
button a form will be displayed where you can fill in the fields that we need to show on our invoices.
In the same way, tapping on a client/supplier in the lists will allow us to edit/delete the data of that client.
IMPORTANT: Deleting a client/supplier does not delete the invoices associated with that client/supplier. If you want to delete a client/supplier from your database because you know that you will not use that data again, you will not lose the invoices associated with them.
In our example, we add a generic customer that we will use for sales that will not require the issuance of a personalized invoice.
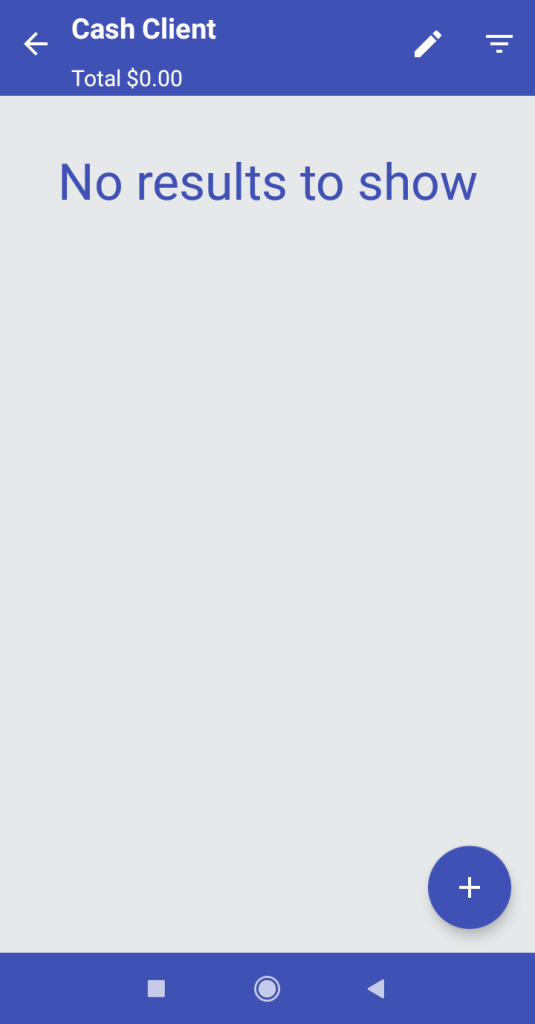
Click on SAVE and in our Clients Details Screen, we are going to use this client to generate a new invoice.
The app will show us the client´s name in the toolbar and an empty list.
Plus, we will see the total of the invoices that client has, the ![]() button to edit/delete their data and the
button to edit/delete their data and the ![]() button (as we have mentioned before). All ready to add a new sale. Push
button (as we have mentioned before). All ready to add a new sale. Push ![]() button and we are going to add the first invoice of our Cash Client recently created.
button and we are going to add the first invoice of our Cash Client recently created.
4.2 Adding a new invoice manually
We have already seen that a notification from a client automatically introduced an invoice. The manual management of invoices is not much more complicated either.
When we add a new invoice or want to delete an existing one, the app will ask us if we want to add items to the newly created invoice or delete it permanently. Click on Add Items and we can search for the product from our catalog that we want to add.

We can search alphanumerically or using the barcode reader ![]() .
.
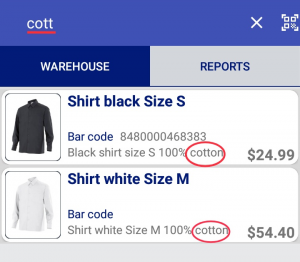
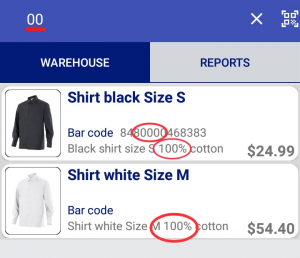
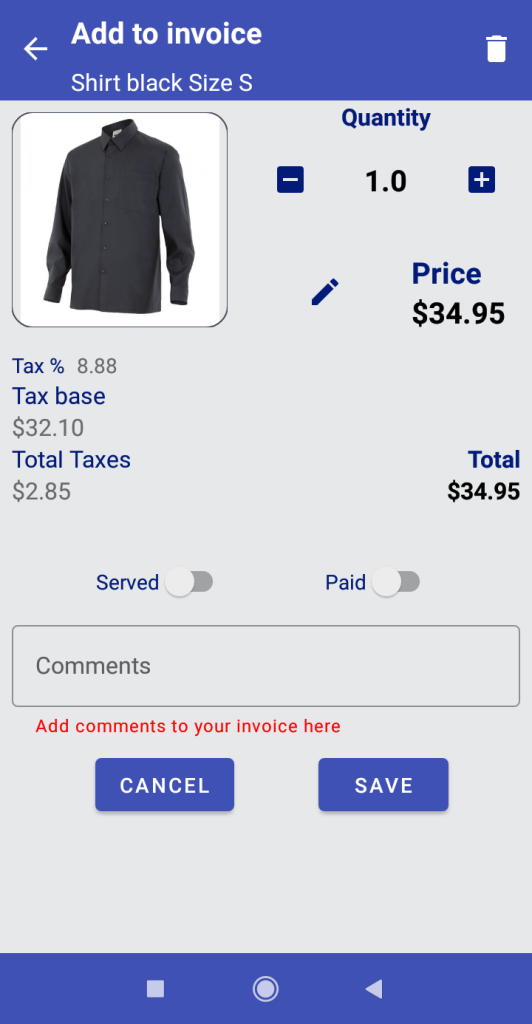
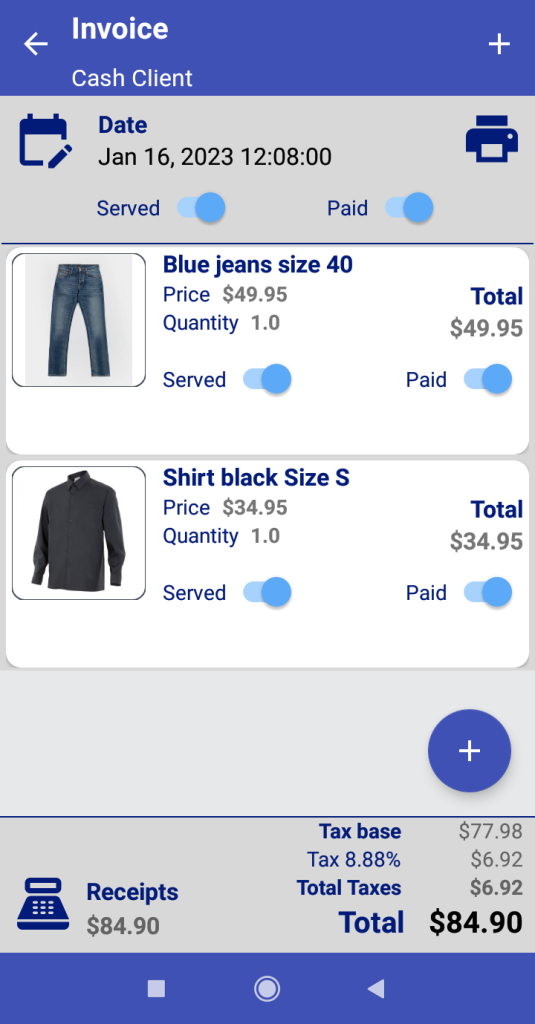
Once the product is selected, we will have the possibility to modify the quantity, price of the sale, add comments to the invoice and change Served and Paid state.
Let’s see the management of invoices in our next section.
Invoices
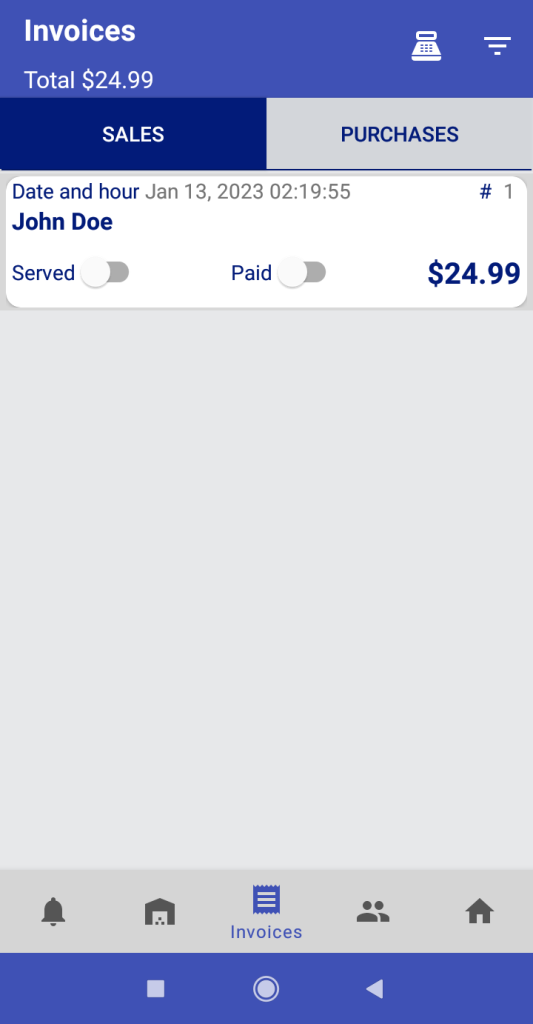
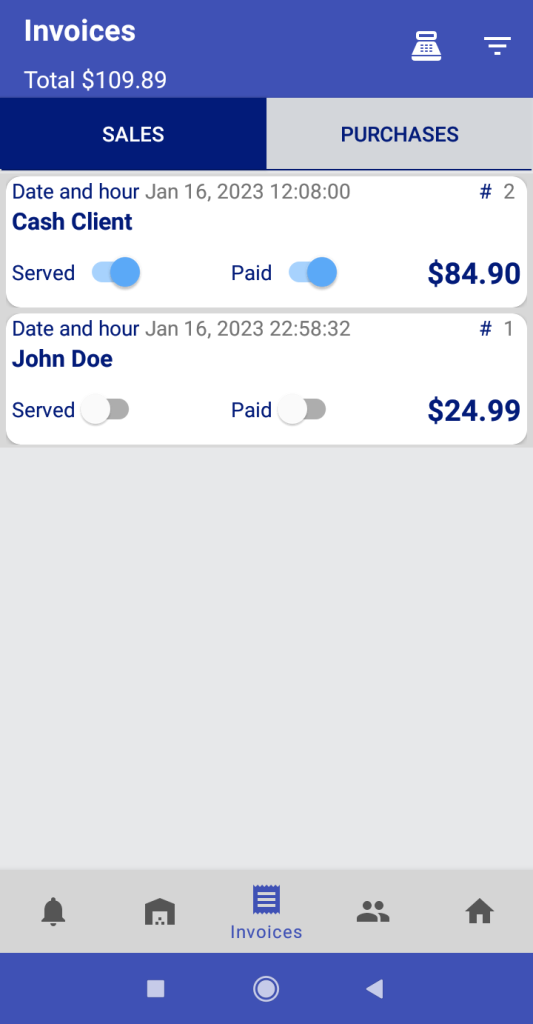
5.1 Invoices: SALES screen
Here we have the list of our sales invoices.
5.1.1 SALES: filtering invoices
The toolbar filter icon ![]() will show us the different ways of filtering that we have for our invoices. All configured and designed so that no detail is missing and the information is accessible accurately and quickly.
will show us the different ways of filtering that we have for our invoices. All configured and designed so that no detail is missing and the information is accessible accurately and quickly.

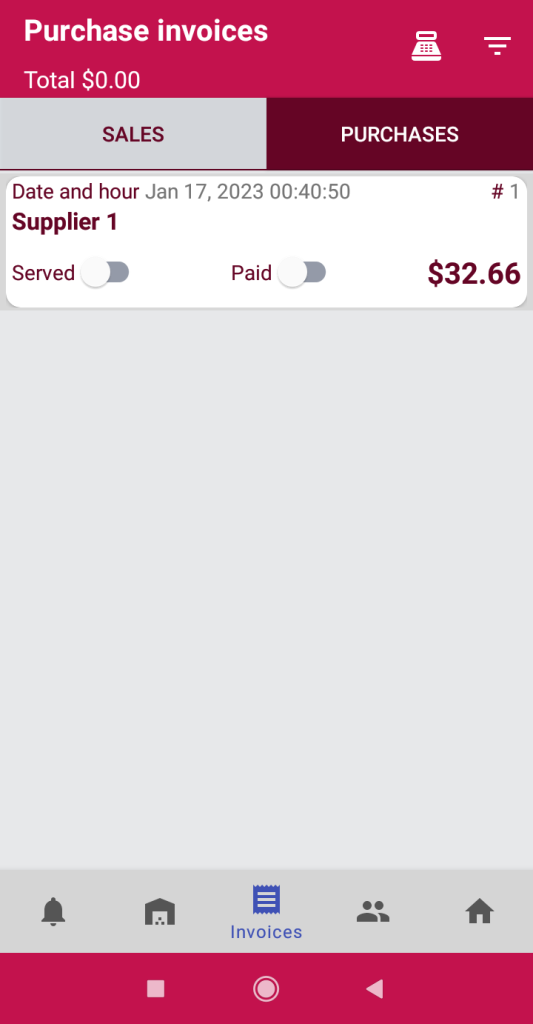
5.2 Invoices: PURCHASES screen
It shows the lists of our purchase invoices with the same options and usability as the section of our sales invoices but with a different color to avoid errors while we work.

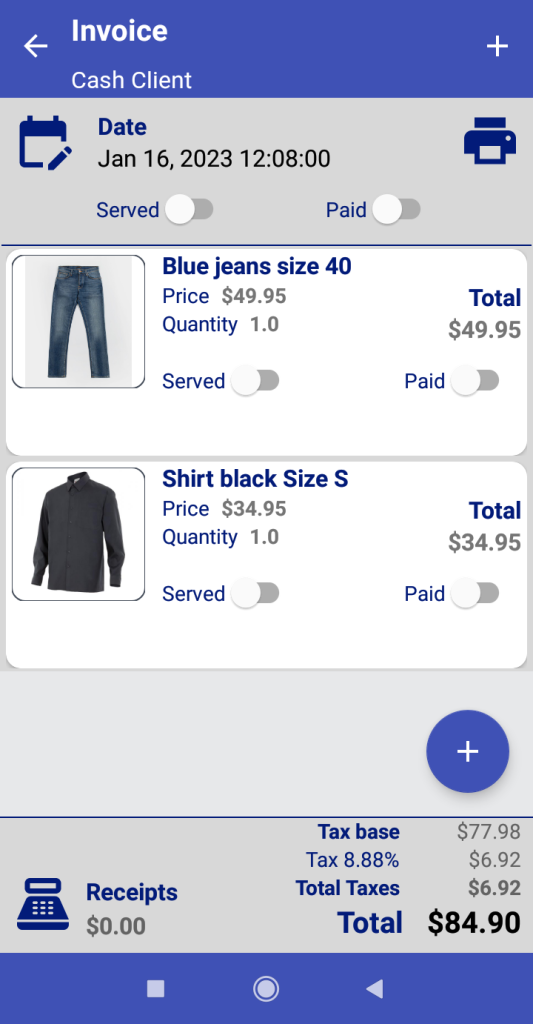
5.3 Invoice details
5.3.1 Edit/update/delete invoice
In the invoice we can add new items with the ![]() button, edit the date/time
button, edit the date/time ![]() , generate a document for printing
, generate a document for printing ![]() , see the general status of the invoice (if it is fully Paid or Served), the total with the corresponding tax breakdown and the payments received
, see the general status of the invoice (if it is fully Paid or Served), the total with the corresponding tax breakdown and the payments received ![]() .
.
If any element is not Served or Paid, the general status of the invoice will indicate it in the general lists and in the upper indicators we will see that some element is missing to be collected/served.
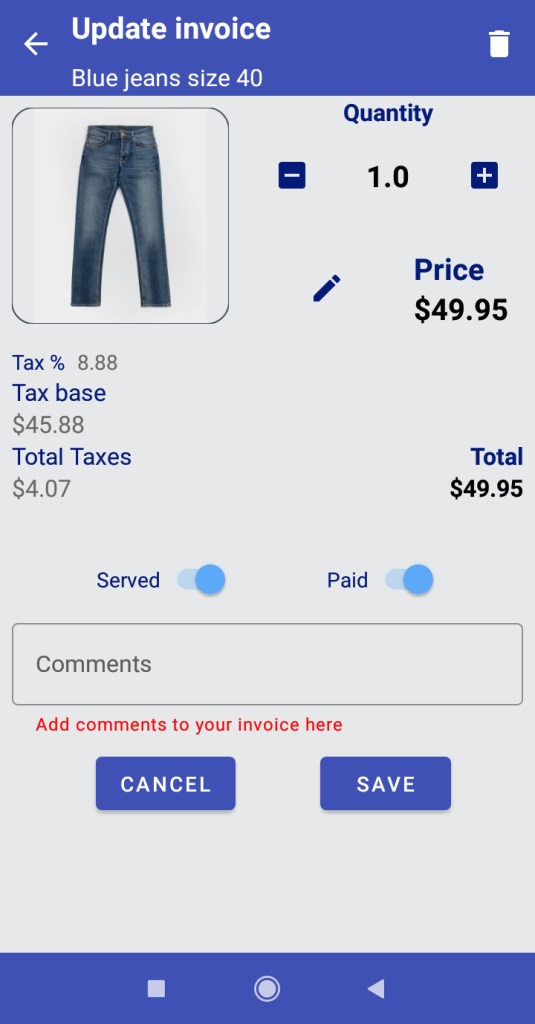
Tap on the desired element and we can edit quantity, price and status: pending/delivered and payments made.
We can also Print/Email the invoice automatically with the print button ![]() .
.
5.3.2 Edit invoice details
By activating Served, the app will discount the quantity sold from our warehouse. This detail is important because there will be cases in which we will have invoiced products that have not yet been served to the customer. Everything is designed to have a detailed control of our business.
In our example, the sale is immediate (we will activate Served) and we will generate the collection (we will activate Paid). Let’s look at collection management.
5.3.3 Edit invoice: Collections
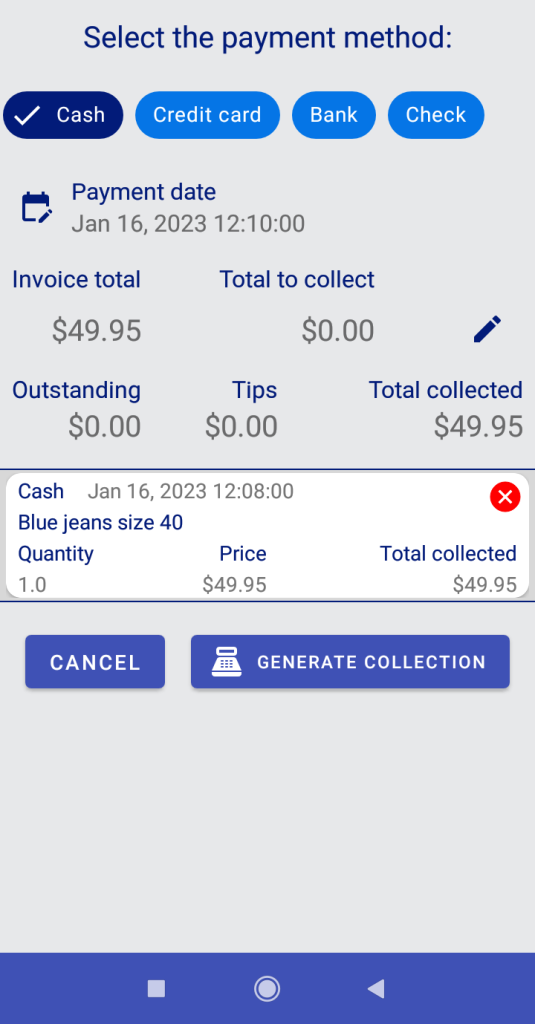
Activating Paid button takes us to the following dialog where we can manage the payment.
We select the payment method (Cash, Credit Card, Bank, Check) and we can also edit the amount, the date and hour of the collection. If the amount charged is less than the total amount, the app will generate a partial collection. If the collected amount it´s more than total, the app will reflect the amount in Tips. It will not be necessary to separate the money: it will always be clear what has been collected and the concept of the collection.
Tapping on Paid again will show us the collection list. If we want to edit/delete/update the the charges, you can delete the current charge, change the date, the payment method and the amount collected.

In our Invoice Screen, by tappling on ![]() Receipts, we can see the list of all the collection details.
Receipts, we can see the list of all the collection details.
When all the elements of an invoice are paid or served, the general status indicator at the top will also change status and we can see it from the general list of invoices as well.
In the footer, in case of having several tax rates, they would appear broken down into different lines.
In our list of Invoices we will see our documents numbered by ascending date/time, the Total amount, and we will have access to fast advanced filters ![]() and collections
and collections ![]() reports.
reports.
In the same way, we will be able to access the PURCHASE invoices (whose operation is the same but with all the screens red colored for greater clarity and to avoid miss click errors).
5.4 Receipts and payments reports:
button
Access to information about our receipts and payments.
We also have quick one-click filters by time period and more advanced date filter options ![]() .
.
In the same way as with invoices, the PAYMENTS screens will appear in red and the collection screens in blue. In the TOTAL, collections and payments are also differentiated by color.


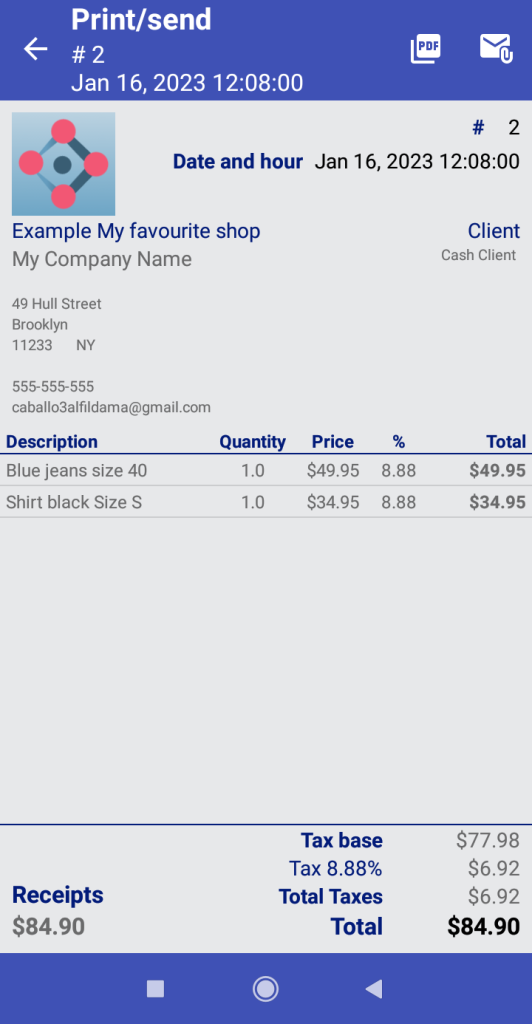
5.5 Print/Send invoices:
button
First time, the app will ask us for permission to access our storage. It is necessary if we want to save a copy of our invoices in .pdf as we will see.
Once permissions are granted, the app will show us the Printing Screen where we see two options in the toolbar: Save as .pdf button ![]() and Attach to email button
and Attach to email button ![]() .
.
Save as .pdf will save a copy of the invoice in “Documents” on our device. Attach to email will open a dialog where we can choose our email management app and thus send an email to the client with a copy of the pdf file attached.
If our client has provided us with his email or we have entered it when adding him manually, this “Invoice attached to email” screen is what we will see after selecting our email manager, where we can also edit the standard message provided by the app.

 CLIENT quick guide
Share images guide
Google Play Download
CLIENT quick guide
Share images guide
Google Play Download